Behaviors are instances of the yii\base\Behavior class. A behavior injects its methods and properties to the component it is attached to. Behaviors can also respond to the events triggered by the component.
Step 1 − To define a behavior, extend the yii\base\Behavior class.
namespace app\components;
use yii\base\Behavior;
class MyBehavior extends Behavior {
   private $_prop1;
   public function getProp1() {
      return $this->_prop1;
   }
   public function setProp1($value) {
      $this->_prop1 = $value;
   }
   public function myFunction() {
      // ...
   }
}
The above code defines the behavior with one property (prop1) and one method (myFunction). When this behavior is attached to a component, that component will also have the prop1 property and the myFunction method.
To access the component the behavior is attached to, you may use the yii\base\Behavior::$owner property.
Step 2 − If you want a behavior to respond to the component events, you should override the yii\base\Behavior::events() method.
namespace app\components;
use yii\db\ActiveRecord;
use yii\base\Behavior;
class MyBehavior extends Behavior {
   public function events() {
      return [
         ActiveRecord::EVENT_AFTER_VALIDATE => 'afterValidate',
      ];
   }
   public function afterValidate($event) {
      // ...
   }
}
Step 3 − To attach a behavior, you should override the behaviors() method of the component class.
namespace app\models;
use yii\db\ActiveRecord;
use app\components\MyBehavior;
class MyUser extends ActiveRecord {
   public function behaviors() {
      return [
         // anonymous behavior, behavior class name only
         MyBehavior::className(),
         // named behavior, behavior class name only
         'myBehavior2' => MyBehavior::className(),
         // anonymous behavior, configuration array
         [
            'class' => MyBehavior::className(),
            'prop1' => 'value1',
            'prop2' => 'value2',
            'prop3' => 'value3',
         ],
         // named behavior, configuration array
         'myBehavior4' => [
            'class' => MyBehavior::className(),
            'prop1' => 'value1'
         ]
      ];
   }
}
Step 4 − To detach a behavior, call the yii\base\Component::detachBehavior() method.
$component->detachBehavior('myBehavior');To show behaviors in action, we need data.
Preparing the DB
Step 1 − Create a new database. Database can be prepared in the following two ways.
- In the terminal run mysql -u root –p.
- Create a new database via CREATE DATABASE helloworld CHARACTER SET utf8 COLLATE utf8_general_ci;
Step 2 − Configure the database connection in the config/db.php file. The following configuration is for the system used currently.
<?php
   return [
      'class' => 'yii\db\Connection',
      'dsn' => 'mysql:host = localhost;dbname = helloworld',
      'username' => 'vladimir',
      'password' => '12345',
      'charset' => 'utf8',
   ];
?>
Step 3 − Inside the root folder run ./yii migrate/create test_table. This command will create a database migration for managing our DB. The migration file should appear in the migrations folder of the project root.
Step 4 − Modify the migration file (m160106_163154_test_table.php in this case) this way.
<?php
   use yii\db\Schema;
   use yii\db\Migration;
   class m160106_163154_test_table extends Migration {
      public function safeUp() {
         $this->createTable("user", [
            "id" => Schema::TYPE_PK,
            "name" => Schema::TYPE_STRING,
            "email" => Schema::TYPE_STRING,
         ]);
         $this->batchInsert("user", ["name", "email"], [
            ["User1", "[email protected]"],
            ["User2", "[email protected]"],
            ["User3", "[email protected]"],
            ["User4", "[email protected]"],
            ["User5", "[email protected]"],
            ["User6", "[email protected]"],
            ["User7", "[email protected]"],
            ["User8", "[email protected]"],
            ["User9", "[email protected]"],
            ["User10", "[email protected]"],
            ["User11", "[email protected]"],
         ]);
      }
      public function safeDown() {
         $this->dropTable('user');
      }
   }
?>
The above migration creates a user table with these fields: id, name, and email. It also adds a few demo users.
Step 5 −Inside the project root run./yii migrate to apply the migration to the database.
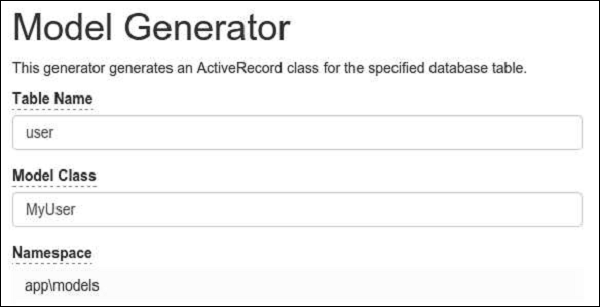
Step 6 − Now, we need to create a model for our user table. For the sake of simplicity, we are going to use the Gii code generation tool. Open up this url: http://localhost:8080/index.php?r=gii. Then, click the “Start” button under the “Model generator” header. Fill in the Table Name (“user”) and the Model Class (“MyUser”), click the “Preview” button and finally, click the “Generate” button.
The MyUser model should appear in the models directory.
Leave a Reply