If you use a contemporary IDE, you’re probably used to code highlighting and completion. Likewise, in a typical PHP framework, you can include a folder with a framework to go to a function declaration just in one click. Seeing as Phalcon is an extension, we don’t get this option automatically. Fortunately, there is a tool which fills this gap called “Phalcon Dev Tools,” which can be installed via Composer (if you still don’t know what it is, the time is now to get to know about this amazing package manager). Phalcon Dev Tools consist of code stubs for all the classes and functions in Phalcon, and provide some code generators with both console and GUI versions, documented on the PhalconPHP website. These tools can help with creating all the parts of the MVC pattern, but we’ll only cover model generation.
OK, let’s install Phalcon Dev Tools via Composer. Our composer.json file will look like this:
{
  "require": {
    "php": ">=5.6.0",
    "ext-phalcon": ">=3",
    "ext-pgsql": "*"
  },
  "require-dev": {
    "phalcon/devtools": "3.*.*@dev"
  }
}
As you can see,we require PHP 5.6, Phalcon 3, and the pgsql extension (which you can change to your database extension or exclude altogether).
Make sure that you’ve got the correct PHP, Phalcon, and DB extension versions, and run composer:
$ composer install
The next step is to create our database. It is very simple and consists only of one table, users. Though I’ve included a pg_dump file in the project, here’s the SQL in PostgreSQL dialect:
CREATE DATABASE articledemo;

CREATE TABLE public.users (
  id INTEGER PRIMARY KEY NOT NULL DEFAULT nextval('users_id_seq'::regclass),
  first_name CHARACTER VARYING(255),
  last_name CHARACTER VARYING(255),
  pass CHARACTER VARYING(255),
  login CHARACTER VARYING(255) NOT NULL
);
Now that the database is created, we can proceed to the model generation process. Phalcon Dev Tools uses an empty .phalcon folder to detect if an application is a Phalcon project, so you’ll have to create this empty folder in your project root. It also uses some settings from the configuration file we’ve created—all the variables stored under the application section and adapter from the database section. To generate our model, we need to execute the following command from the project root folder:
$ php vendor/phalcon/devtools/phalcon.php model users --namespace="App\Models" --get-set
If all the previous steps have been done correctly, you’ll get a working model file, Users.php, in your models folder, already placed in a namespace with getters and setters as the command line indicated. Next is the controller.
CONTROLLERS AND ROUTING
Since our application only CRUDs (creates, reads, updates, and deletes) users, we’ll create only one controller, the Users controller with the following operations:
- Add user
- Show list of users
- Update user
- Delete user
While controllers can be created with the help of Phalcon Dev Tools, we’ll do it manually and implement AbstractController and its child, UsersController.
Creating the AbstractController is a good decision for Phalcon because we can place all the necessary classes which we’ll get from dependency injection into the PHPDoc block. This will help with the IDE autocomplete function. We can also program in some error constants that are common to all the potential controllers.
For now, our abstract controller will look like this:
<?php

namespace App\Controllers;

/**
 * Class AbstractController
 *
 * @property \Phalcon\Http\Request              $request
 * @property \Phalcon\Http\Response             $htmlResponse
 * @property \Phalcon\Db\Adapter\Pdo\Postgresql $db
 * @property \Phalcon\Config                    $config
 * @property \App\Services\UsersService         $usersService
 * @property \App\Models\Users                  $user
 */
abstract class AbstractController extends \Phalcon\DI\Injectable
{
    /**
     * Route not found. HTTP 404 Error
     */
    const ERROR_NOT_FOUND = 1;

    /**
     * Invalid Request. HTTP 400 Error.
     */
    const ERROR_INVALID_REQUEST = 2;
}
Just a simple Phalcon injectable class, as specified by the extends syntax, nothing more. Next, let’s create the UsersController skeleton:
<?php

namespace App\Controllers;

/**
 * Operations with Users: CRUD
 */
class UsersController extends AbstractController
{
    /**
     * Adding user
     */
    public function addAction()
    {

    }

    /**
     * Returns user list
     *
     * @return array
     */
    public function getUserListAction()
    {

    }

     /**
     * Updating existing user
     *
     * @param string $userId
     */
    public function updateUserAction($userId)
    {

    }

    /**
     * Delete an existing user
     *
     * @param string $userId
     */
    public function deleteUserAction($userId)
    {

    }
}
At the moment, it’s just a class with empty actions which will eventually hold corresponding HTTP requests.
Now it’s time to fill in the routes.php file. In Phalcon micro applications we create collections, one for each controller, and add all the handled requests as get, post, put, delete methods, which take a route pattern and a proceeding function as arguments. Note that a proceeding function should either be an anonymous function or a controller’s method name. Here’s what our routes.php file looks like:
<?php

$usersCollection = new \Phalcon\Mvc\Micro\Collection();
$usersCollection->setHandler('\App\Controllers\UsersController', true);
$usersCollection->setPrefix('/user');
$usersCollection->post('/add', 'addAction');
$usersCollection->get('/list', 'getUserListAction');
$usersCollection->put('/{userId:[1-9][0-9]*}', 'updateUserAction');
$usersCollection->delete('/{userId:[1-9][0-9]*}', 'deleteUserAction');
$app->mount($usersCollection);

// not found URLs
$app->notFound(
  function () use ($app) {
      $exception =
        new \App\Controllers\HttpExceptions\Http404Exception(
          _('URI not found or error in request.'),
          \App\Controllers\AbstractController::ERROR_NOT_FOUND,
          new \Exception('URI not found: ' . $app->request->getMethod() . ' ' . $app->request->getURI())
        );
      throw $exception;
  }
);
We also set a handling controller and a URI prefix. For our example, a URI will look like http://article.dev/user/add, and it must be a post request. If we want to change user data, the URI must be a put request and will look like http://article.dev/user/12 to change data for the user with an ID of 12. We also define a not-found URL handler, which throws an error. For more information, refer to the PhalconPHP documentation for routes in a full stack application, and for routes in a micro application.
Let’s move to the controller’s body, and specifically the addAction method (all the others are similar; you can see them in the application code). A controller method does five things:
- Gets and validates request parameters
- Prepares data for the service method
- Calls the service method
- Handles exceptions
- Sends the response
Let’s walk through each step, starting with validation. While Phalcon has a powerful validation component, it’s much more expedient to validate data in an old-style way in this case, so, our validation block will look like this:
$errors = [];
$data = [];

$data['login'] = $this->request->getPost('login');
if (!is_string($data['login']) || !preg_match('/^[A-z0-9_-]{3,16}$/', $data['login'])) {
            $errors['login'] = 'Login must consist of 3-16 latin symbols, numbers or \'-\' and \'_\' symbols';
}
Here we check if the post parameter is a string that matches a regular expression. All values are put into the $data array, which is then passed to the UsersService class. All errors are placed into the $errors array, which then is added to an error details’ array inside Http400Exception, where it will be transformed into the detailed response seen in index.php:
Here is the full addAction method code with all its validation, which includes a call to the createUser method in UsersService (which we haven’t created yet):
    public function addAction()
    {
       /** Init Block **/
        $errors = [];
        $data = [];
   /** End Init Block **/

   /** Validation Block **/
        $data['login'] = $this->request->getPost('login');
        if (!is_string($data['login']) || !preg_match('/^[A-z0-9_-]{3,16}$/', $data['login'])) {
            $errors['login'] = 'Login must consist of 3-16 latin symbols, numbers or \'-\' and \'_\' symbols';
        }

        $data['password'] = $this->request->getPost('password');
        if (!is_string($data['password']) || !preg_match('/^[A-z0-9_-]{6,18}$/', $data['password'])) {
            $errors['password'] = 'Password must consist of 6-18 latin symbols, numbers or \'-\' and \'_\' symbols';
        }

        $data['first_name'] = $this->request->getPost('first_name');
        if ((!empty($data['first_name'])) && (!is_string($data['first_name']))) {
            $errors['first_name'] = 'String expected';
        }

        $data['last_name'] = $this->request->getPost('last_name');
        if ((!empty($data['last_name'])) && (!is_string($data['last_name']))) {
            $errors['last_name'] = 'String expected';
        }

        if ($errors) {
            $exception = new Http400Exception(_('Input parameters validation error'), self::ERROR_INVALID_REQUEST);
            throw $exception->addErrorDetails($errors);
        }
   /** End Validation Block **/

   /** Passing to business logic and preparing the response **/
        try {
            $this->usersService->createUser($data);
        } catch (ServiceException $e) {
            switch ($e->getCode()) {
                case AbstractService::ERROR_ALREADY_EXISTS:
                case UsersService::ERROR_UNABLE_CREATE_USER:
                    throw new Http422Exception($e->getMessage(), $e->getCode(), $e);
                default:
                    throw new Http500Exception(_('Internal Server Error'), $e->getCode(), $e);
            }
        }
   /** End Passing to business logic and preparing the response  **/
    }
As you can see, we handle two known exceptions in that last section: user already exists and unable to create user due to some internal problem such as a database connection error. By default, unknown exceptions will be thrown as an HTTP 500 (internal server error). Though we don’t give any details to the end user, it is strongly recommended to store all error details (including trace) in the log.
And, please, don’t forget to use all the necessary classes, borrowed from the other namespaces:
use App\Controllers\HttpExceptions\Http400Exception;
use App\Controllers\HttpExceptions\Http422Exception;
use App\Controllers\HttpExceptions\Http500Exception;
use App\Services\AbstractService;
use App\Services\ServiceException;
use App\Services\UsersService;
BUSINESS LOGIC
The last part to create is business logic. Just like with the controllers, we’ll create an abstract service class:
<?php

namespace App\Services;

/**
 * Class AbstractService
 *
 * @property \Phalcon\Db\Adapter\Pdo\Postgresql $db
 * @property \Phalcon\Config                    $config
 */
abstract class AbstractService extends \Phalcon\DI\Injectable
{
    /**
     * Invalid parameters anywhere
     */
    const ERROR_INVALID_PARAMETERS = 10001;

    /**
     * Record already exists
     */
    const ERROR_ALREADY_EXISTS = 10002;
}
The idea is completely the same as in controller’s block, so I won’t comment it. Here’s the skeleton of our UsersService class:
<?php

namespace App\Services;

use App\Models\Users;

/**
 * business logic for users
 *
 * Class UsersService
 */
class UsersService extends AbstractService
{
  /** Unable to create user */
  const ERROR_UNABLE_CREATE_USER = 11001;

  /**
   * Creating a new user
   *
   * @param array $userData
   */
  public function createUser(array $userData)
  {

  }
}
And the createUser method itself:
public function createUser(array $userData)
{
  try {
    $user   = new Users();
    $result = $user->setLogin($userData['login'])
                   ->setPass(password_hash($userData['password'], PASSWORD_DEFAULT))
                   ->setFirstName($userData['first_name'])
                   ->setLastName($userData['last_name'])
                   ->create();

    if (!$result) {
      throw new ServiceException('Unable to create user', self::ERROR_UNABLE_CREATE_USER);
    }

  } catch (\PDOException $e) {
    if ($e->getCode() == 23505) {
      throw new ServiceException('User already exists', self::ERROR_ALREADY_EXISTS, $e);
    } else {
      throw new ServiceException($e->getMessage(), $e->getCode(), $e);
    }
  }
}
This method is as easy as can be. We just create a new model object, call its setters (which returns the object itself; this allows us to make a call chain) and throw a ServiceException in the case of an error. That’s it! We can now proceed to testing.
TESTING
Now let’s look at the results using Postman. Let’s test some trash data first:

Request:
POST http://article.dev/user/add
login:1
password:1
first_name:Name
last_name:Sourname
Response (400: Bad Request):
{
  "error": 2,
  "error_description": "Input parameters validation error",
  "details": {
    "login": "Login must consist of 3-16 latin symbols, numbers or '-' and '_' symbols",
    "password": "Password must consist of 6-18 latin symbols, numbers or '-' and '_' symbols"
  }
}
That checks out. Now for some correct data:
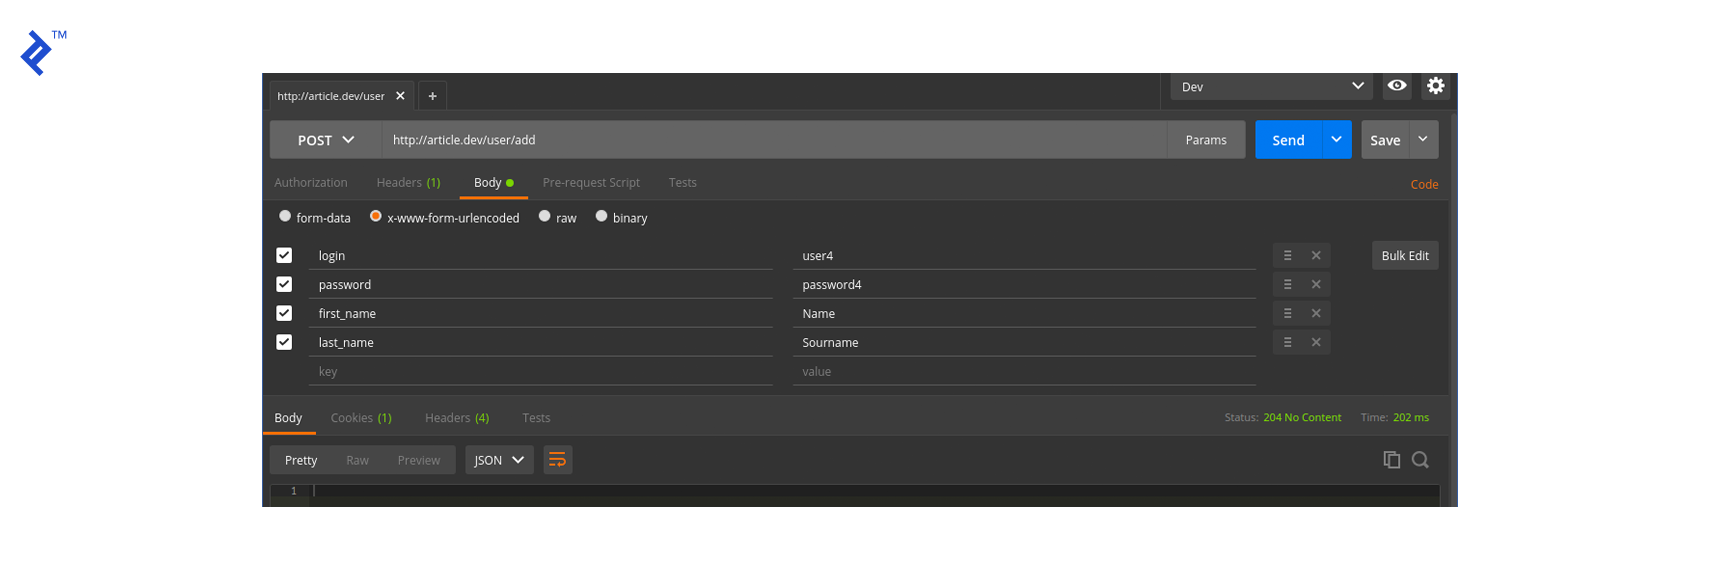
Request:
POST http://article.dev/user/add
login:user4
password:password4
first_name:Name
last_name:Sourname
Response (204):
No content, which is what we expected. Now let’s make sure it worked and get the full user list (which we didn’t describe in the article, but you can see it in the application example):
Request:
GET http://article.dev/user/list
Response (200 OK):
[
  {
    "id": 1,
    "login": "user4",
    "first_name": "Name",
    "last_name": "Sourname"
  }
]
Well, it works!
LOGGING AND CACHING
It’s hard to imagine a high-load application without logging and caching, and Phalcon provides very seductive classes for it. But I’m writing an article here, not a book; I’ve added logging and caching to the sample application, but I’ve placed this code into another branch called logging-and-cache so you can easily look at it and see the difference in the code. Just like the other Phalcon features, these two are well-documented: Logging and Caching.
Leave a Reply