Welcome to the tutorial of NestJS. This tutorial is solely intended to make you gain absolute knowledge of NestJS. You would be learning about it from a beginner level covering all the tiny staircases that will push you into installation, creating a new application from NestJS from scratch, and learn how to handle and implement in the day-to-day scenarios. Let’s get started.
What is NestJS?
NestJS is quite a popular and cumulative JavaScript framework functioning under the hood of Node.js and is used to construct scalable, reliable, and efficient server-side applications. The framework is channeled with the Node.js environment and supports TypeScript fully. It also can be scaled to make use of Express.js under the influence of Node.js. Since NestJS is a full TypeScript supported framework, it can enable developers like you to code purely in JavaScript and would let you combine the concepts of Object-Oriented Programming(OOP), Functional Reactive Programming(FRP), and purely Functional Programming(FP).
Behind the scene
You might not know certain aspects that work as the basic building blocks of NestJS. To be precise, NestJS makes use of heavy usage of the server-side framework like Express under the hood of robust HTTP infrastructure. It can also be optionally configured to make use of Fastify as well although Express is considered as default.
NestJS aims to provide a certain level of abstraction mechanism to the developers so that not only the common server-side frameworks like Fastify or Express that are integrated internally, but can also be exposed to the APIs chosen by the developer. These hidden bars provide developers like you to gain the freedom to use the third-party modules vividly and they can be made to underlie in the NestJS platform without having to manipulate the entire server-side.PauseNextMute
Installation
Before you start creating your back-end application using NestJS, all you need to do is to make sure you have Nest CLI is primarily installed on your local computer. If it is not installed, make use of the Node Package Manager (NPM) and follow up the approach using the commands given below.
$ npm i -g@nestjs/cliAlthough, you might need to make sure Node.js and NPM are preinstalled in your local system. If not, just follow the instructions to install Node.js on https://nodejs.org/.
Once the NestJS CLI installation is marked complete, it will readily be available to use the commands. Since you are learning it practically consider making a small NestJS based project so that you can be able to apply the knowledge with hands-on experience. To proceed with creating a sample project, use the following command to initialize it.
$ npm new my-nestjs-01 One execution of this command, a new folder named my-nestjs-01 is created in the location provided currently and all the default project templates are thereby downloaded into this folder.
Project Structure
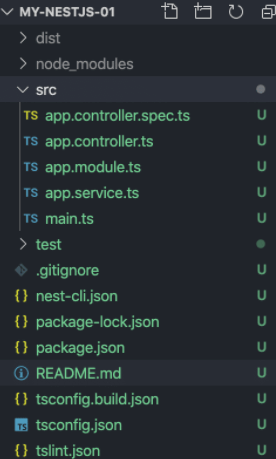
After the folder is created for the project, node modules of NestJS along with other boilerplate dependencies are created which consists of several core program files. These core files can be visualized from the image below. It consists of various important source codes which would be discussed along.

In the above image, you can visualize all the files and dependencies some of which are core files. The most important file in the shown image is the src folder. This the warehouse of TypeScript files where you would find the application code. In this project, you’d be spending often most of the time playing out the src folder. All of these core files are discussed below.
main.ts: It is the application’s entry point. It consists of a method NestFactory.create() which creates a new instance of the Nest application.
app.modules.ts: It contains the module of the application’s implementation.
app.controller.ts: It consists of only one routed implementation controller of NestJS.
app.services.ts: It is the usual service method implementation.
app.controller.specs.ts: It testes the file for the controller.
Now, let’s take a closer look at the main.ts file that contains the default implementation methods.
pModule } from './app.module';


async function bootstrap() {

  const app = await NestFactory.create(AppModule);

  await app.listen(3000);

}

bootstrap();
In the above code, first of all, the NestFactory method is imported as an entry point of the application. Next, the AppModule is imported from the previously discussed app. module file. Secondly, the bootstrap is marked as async and implemented. The main purpose of importing the bootstrap function is to call it for the code execution.
Secondly, the execution takes when the NestFactory.create() method is called the AppModule is passed as an argument to the root application module. This will attach a module by creating a new NestJS instance. The next step is to start the server by using the event listener method on the webserver with port 3000. This method will return a promise indicating that the server has been successfully started embarking on the await key.
Now, you have to move to the implementation of the root application having modules that can be found inside the file app.module.ts. The code inside it contains the following.
import { Module } from '@nestjs/common';

import { AppController } from './app.controller';

import { AppService } from './app.service';


@Module({

  imports: [],

  controllers: [AppController],

  providers: [AppService],

})

export class AppModule {}
In the above code snippet, the AppModule is imported as a method and @Module decorator is imported from @nestjs/ sharing common library. The @Module decorator when passed consists of three properties namely imports, controllers, and providers.
The specified controllers in the AppModule should always be the part of the array assigned to the property in the initial stage of the application development because the count of the controller is constrained to AppController which is the root module. Moreover, the services should be made readily available in AppModule and hence be listed in the array assigned to the property of providers.
Next, you would be looking AppController and its implementation in app.controller.ts. The code is given below.
import { Controller, Get } from '@nestjs/common';

import { AppService } from './app.service';


@Controller()

export class AppController {

  constructor(private readonly appService: AppService) {}


  @Get()

  getHello(): string {

    return this.appService.getHello();

  }

}
The above code snippet is a simple demonstration of a controller in NestJS consisting of only one GET route. The class can be made controller just by adding the @Controller decorator. It is also imported from the @nestjs/ which is a common library for all.
The point here is to understand clearly that the controller usually relies on a service class. In the examples given AppController uses Appservice to implement the app.services.ts file by importing the corresponding statement that is added at the top.
However, the process of inserting AppService into AppController is based on the method of Dependency Injection which by default adds the parameter of the same type. A default route is then implemented to handle the HTTP GET request through @Get decorator to implement getHello method. The method is therefore powered by AppService to fetch data and carry out request and response actions by returning at the same time.
Let’s now move to the next file and observe app.services.ts file.
import { Injectable } from '@nestjs/common';

@Injectable()

export class AppService {

  getHello(): string {

    return 'Hello World!';

  }

}
The above code snippet is a simple demonstration of a controller in NestJS consisting of only one GET route. The class can be made controller just by adding the @Controller decorator. It is also imported from the @nestjs/ which is a common library for all.
The point here is to understand clearly that the controller usually relies on a service class. In the examples given AppController uses Appservice to implement the app.services.ts file by importing the corresponding statement that is added at the top.
However, the process of inserting AppService into AppController is based on the method of Dependency Injection which by default adds the parameter of the same type. A default route is then implemented to handle the HTTP GET request through @Get decorator to implement getHello method. The method is therefore powered by AppService to fetch data and carry out request and response actions by returning at the same time.
Let’s now move to the next file and observe app.services.ts file.
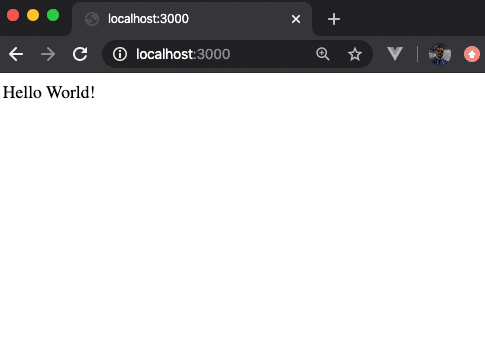
$ npm run start The NestJS application would like something like this.

The above image shows no surprises. The output “Hello World!” is the string that is retrieved from the service proposed by the getHello method and is later returned as the HTTP GET response through the controller method corresponding to it.
Summary
This tutorial is enough to cover all the aspect of learning NestJS along with its real life application from installing to making a sample application. In this tutorial, you learned what is the application of NestJS, how often is it used and what are the usual scenarios where it is practically implemented. Although NestJS is not quite useful amongst JavaScript developers much but since it is fully TypeScript supported many developers make use of its dynamic codes to solve design pattern problems. NestJS is growing popular with the increased dependency of Node.js it uses under the hood along with frameworks like Express. For the sake of understanding, you learned how to develop an application using NestJS just by importing all the core files discussed in this article. There can also be the case of implementing the application with the use of certain modules like adding Courses, testing it with Postman and controlling the end points flow.
Leave a Reply