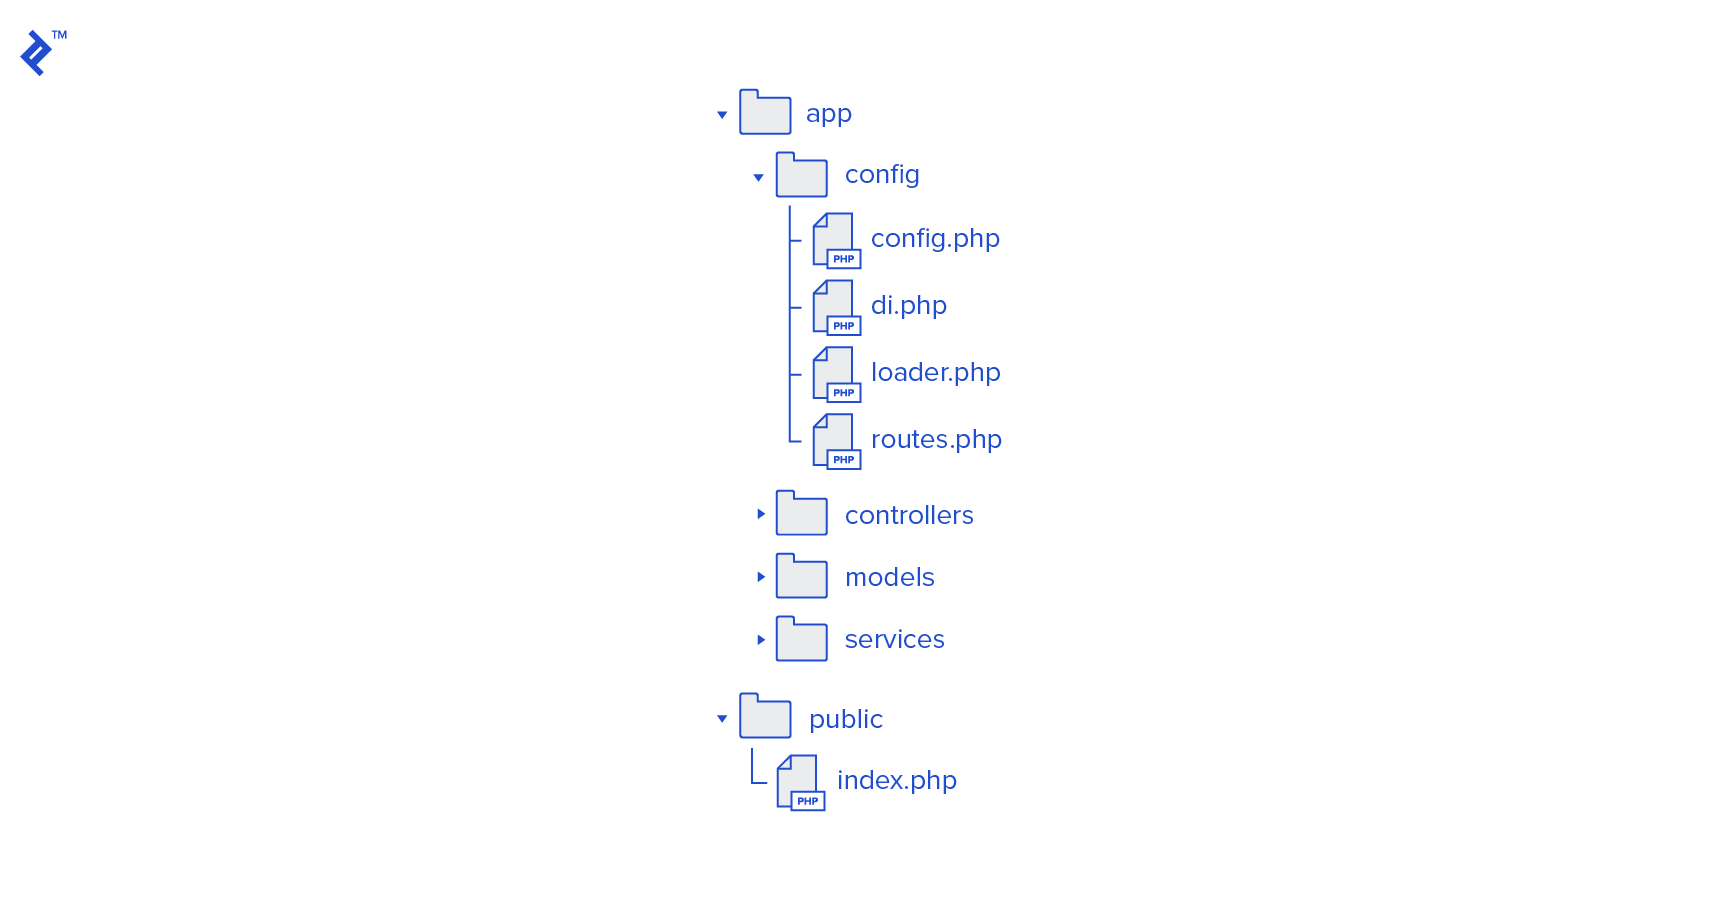
First of all, create the initial project structure.
While Phalcon lets you use any structure you like, the structure I chose for this exercise partly implements an MVC-pattern. We have no views because it’s a RESTful project, but we have controllers and models, each with their own folder, and services. Services are the classes that implement the business logic of the project, dividing the “model” part of MVC into two pieces: data models (which communicate with the database) and business logic models.
index.php, located in the public folder, is a bootstrap file that loads all the necessary parts and configuration. Note that all our configuration files are placed in the config folder. We could put these in the bootstrap file (and this is the way shown in the official documentation), but, in my opinion, this gets unreadable in big projects, so I prefer the folder separation from the very beginning.
CREATING INDEX.PHP
Our first pass at index.php will load configuration and autoload classes, then initialize routes, a dependency injection container, and the PhalconPHP micro application. It will then pass control over to that micro application core, which will handle requests according to the routes, run business logic, and returns results.
Let’s take a look at the code:
<?php

try {
  // Loading Configs
  $config = require(__DIR__ . '/../app/config/config.php');

  // Autoloading classes
  require __DIR__ . '/../app/config/loader.php';

  // Initializing DI container
  /** @var \Phalcon\DI\FactoryDefault $di */
  $di = require __DIR__ . '/../app/config/di.php';

  // Initializing application
  $app = new \Phalcon\Mvc\Micro();

  // Setting DI container
  $app->setDI($di);

  // Setting up routing
  require __DIR__ . '/../app/config/routes.php';

  // Making the correct answer after executing
  $app->after(
    function () use ($app) {
      // Returning a successful response
    }
  );

  // Processing request
  $app->handle();
} catch (\Exception $e) {
  // Returning an error response
}
CONFIGURING A \PHALCON\CONFIG OBJECT
There are several ways to store configuration files in Phalcon:
- A YAML file
- A JSON file
- An INI file
- A PHP array
Storing your configuration in a PHP array is the fastest option, and since we’re writing a high-load application and don’t need to slow down our performance, this is what we’ll do. Specifically, we’ll use a \Phalcon\Config object to load our configuration options into the project. We’ll have a very short configuration object:
<?php

return new \Phalcon\Config(
    [
        'database' => [
            'adapter' => 'Postgresql',
            'host' => 'localhost',
            'port' => 5432,
            'username' => 'postgres',
            'password' => '12345',
            'dbname' => 'articledemo',
        ],

        'application' => [
            'controllersDir' => "app/controllers/",
            'modelsDir' => "app/models/",
            'baseUri' => "/",
        ],
    ]
);
This file contains two basic configurations, one for the database and one for the application. Obviously, the database configuration is used for connecting to the database, and as for the application array, we’ll need it later since it’s used by Phalcon’s system tools. You can read about Phalcon configurations in more detail in the official documentation.
CONFIGURING LOADER.PHP
Let’s look at our next configuration file, loader.php. The loader.php file registers namespaces with corresponding directories via the \Phalcon\Loader object. It’s even simpler:
<?php

$loader = new \Phalcon\Loader();
$loader->registerNamespaces(
  [
    'App\Services'    => realpath(__DIR__ . '/../services/'),
    'App\Controllers' => realpath(__DIR__ . '/../controllers/'),
    'App\Models'      => realpath(__DIR__ . '/../models/'),
  ]
);

$loader->register();
Now all the classes from these namespaces will be automatically loaded and available. If you want to add a new namespace and directory, just add a line in this file. You can also avoid using namespaces by registering specific directories or specific files. All these possibilities are described in the PhalconPHP loader documentation.
CONFIGURING THE DEPENDENCY INJECTION CONTAINER
Like many other contemporary frameworks, Phalcon implements a dependency injection (DI) pattern. Objects will be initialized in the DI container and be accessible from it. Likewise, the DI container is connected to the application object, and it will be accessible from all the classes that inherit from the \Phalcon\DI\Injectable class, such as our controllers and services.
Phalcon’s DI pattern is very powerful. I consider this component to be one of the most important in this framework and I strongly recommend you to read its entire documentation to understand how it works. It provides the key to many of Phalcon’s functions.
Let’s take a look at a few of them. Our di.php file will look like this:
<?php

use Phalcon\Db\Adapter\Pdo\Postgresql;

// Initializing a DI Container
$di = new \Phalcon\DI\FactoryDefault();

/**
 * Overriding Response-object to set the Content-type header globally
 */
$di->setShared(
  'response',
  function () {
      $response = new \Phalcon\Http\Response();
      $response->setContentType('application/json', 'utf-8');

      return $response;
  }
);

/** Common config */
$di->setShared('config', $config);

/** Database */
$di->set(
  "db",
  function () use ($config) {
      return new Postgresql(
        [
          "host"     => $config->database->host,
          "username" => $config->database->username,
          "password" => $config->database->password,
          "dbname"   => $config->database->dbname,
        ]
      );
  }
);

return $di;
As you can see, our dependency injection (DI) file is little more complicated and there are some particulars you should be aware of. First off, consider the initialization string: $di = new \Phalcon\DI\FactoryDefault();. We create a FactoryDefault object which inherits \Phalcon\Di (Phalcon allows you to create any DI factory that you want). According to the documentation, FactoryDefault “automatically registers all the services provided by the framework. Thanks to this, the developer does not need to register each service individually providing a full stack framework.” This means that common services such as Request and Response will be accessible within the framework classes. You can see the full list of such services in the Phalcon service documentation.
The next important thing is the setting process: There are several ways to register something in the DI container, and all of them are completely described the the PhalconPHP registering documentation. In our project, though, we use three ways: an anonymous function, a variable, and a string.
The anonymous function allows us to do many things while initializing the class. In this project specifically, we first override a Response object to set the content-type as JSON for all of the project’s responses and then initialize a database adapter, using our configuration object.
As I mentioned before, this project uses PostgreSQL. If you decide to use another database engine, just change the database adapter in the db set function. You can read more about available database adapters and about the database layer in PhalconPHP’s database documentation.
The third thing of note is that I register a $config variable which implements the \Phalcon\Config service. While it’s not actually used within our example project, I’ve decided to include it here because it’s one of most commonly-used services; other projects may need access to the configuration almost everywhere.
The final interesting thing here is the actual setShared method itself. Calling this makes a service “shared,” which means that it starts acting like a singleton. According to the documentation: “Once the service is resolved for the first time the same instance of it is returned every time a consumer retrieves the service from the container.”
CONFIGURING ROUTES.PHP…OR NOT
The last included file is routes.php. Let’s leave it empty for now—we’ll fill it alongside our controllers.
Leave a Reply